Packing and Shipping your Photographs Framed or Unframed |
Success is not the key to happiness. Happiness is the key to success. If you love what you are doing, you will be successful. - Herman Cain
The Importance Of Being Able To Ship Your Work
Selling your work is an important and challenging step. However, shipping your work once the sale is completed is just as important. It can also be just as challenging.
If you sell over the web, or by mail order, all purchases will have to be shipped. If you sell at shows, or in other venues where you meet customers physically, most of your customers will take their purchases with them. However not all your customers will be able to do so. This is because their car may not be big enough to fit your artwork, or they may not want to take heavy and fragile artwork with them. Also, when people are traveling, they are often unable to take artwork with them. This is particularly true when people travel by plane because of the many restrictions placed on luggage by airline companies and airline regulations.
In any case, shipping your work is an ineluctable aspect of doing business. It is therefore important that you know how to package your work quickly, efficiently and in a reliable manner. You do not want the packing to take too much of your time but you do not want the photographs to be damaged on the way to their destination either. How to reach these goals is the purpose of this essay.
Being a photographer this essay is based on my experience shipping framed and unframed photographs. However my advice should apply equally well to other types of artwork although you may have to make adjustments for your specific needs.
Fulfillment
Shipping your work is also called fulfillment. This is because when you ship your work to your customers you are fulfilling your responsibility as a business by providing to your customers the goods they purchased from you. When you sell at shows and customers carry their purchases with them, fulfillment takes place immediately after payment is done. When customers request that their order be shipped, or when orders are place by mail or over the web, fulfillment is delayed until orders are packed and shipped.
Shipping Companies
There are several shipping companies and which one you do business with is both a matter of personal preference and of practicability. In my case, I ship almost everything with the US Postal Service via Priority Mail. I have found the Postal Service to be quite careful in handling artwork. When artwork is too large to be shipped with the USPS, I ship via Federal Express (FedEx) or by UPS. In the case of extremely large artwork that needs to be crated, I ship with a trucking company.
How To Calculate Shipping Costs
I carry a detailed typed shipping costs chart with me at art shows. When I am asked how much shipping is going to cost for a specific piece, I show this chart to my customers. This builds trust because customers can see that I am not figuring shipping costs from the “top of my head” so to speak.
My costs include what I pay at the post office, the cost of all necessary supplies (boxes, bubble wrap, tape, foam peanuts, etc.) plus a fixed amount for the time spent packing (it usually takes me and my wife 3 days to prepare 20-30 packages, our current shipping load after a show). What I charge for shipping covers all of the above expenses.
Another good thing about the post office is that they provide you with free shipping supplies such as tape and boxes. I personally use a lot of USPS priority tape. USPS boxes are good for small unframed prints, however the post office does not offer boxes large enough to ship framed pieces. The USPS tubes (triangles actually) are to be avoided at all costs because they bend during shipping. I used them for only one package and had to replace the print because it was destroyed during transit. I now use only thick round tubes because they are much sturdier.
If you want to order US Postal supplies all you need to do is call 1-800-THE-USPS. There is also a special order form available at your post office.
A note on priority mail: there is only a minimal cost difference between Priority Mail and Parcel Post (about 50 cents to a dollar on a 22x28 framed package for example). However, Priority Mail gets there fast while Parcel Post can take one week or more. To give you an idea of the cost, a 22x28 package from Arizona to California via Priority Mail, packed with foam peanuts which are very light, costs only around $25 to ship and will be in the customer’s hands in two days. The same package from Arizona to Connecticut, which is just as far as one can get in the continental US, is about $35 and will get to its destination in three days. I charge $10 extra when I ship to Canada since packages have to go via international air mail.
Tools
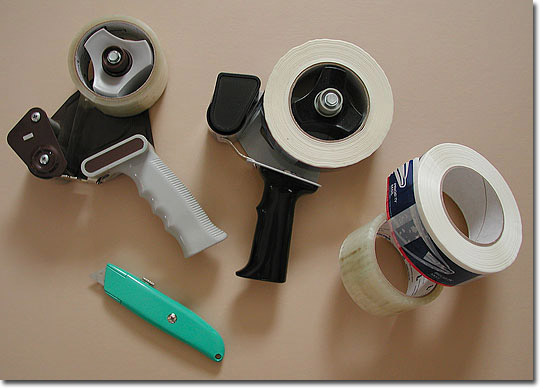
A tape gun is a must. There’s only so long you will stand having to figure out where the end of the tape is on the roll before you go crazy. If you do a lot of shipping you will need at least one tape gun and preferably two, one for USPS priority tape and one for clear tape. I use the USPS priority tape to tape the packages together (close the flaps, hold the sides, reinforce corners, etc.) and I use the clear tape to tape the address label and the warning labels.
You will also need a box cutter, or a utility knife, to cut down boxes and pieces of cardboard.
I also use my wall board cutter to cut large sheets of cardboard to the sizes I need. If you do not have a wall board cutter you can also use a mat cutter. In that case be sure to use a straight blade and not a beveled blade on your mat cutter.
Tracking labels
We place a delivery confirmation label on each package. This costs only 75 cents extra and you can give the tracking number to your customers over the phone or by email. Having a tracking number is reassuring for customers. It also allows you to find out if and when each package was delivered.
Insurance
In over 12 years of regularly shipping packages containing framed pieces, most of them with glass, via the USPS I only had two of them break (I ship about 20 to 30 pieces with glass a month on average). Both of the damaged packages showed evidence of either very rough handling, perhaps because they had been thrown around a lot. Both packages also took longer than normal to be delivered.
When something like this happens and the artwork gets damaged I ask my customer to return the damaged piece and I ship them a free replacement right away. In other words I cover the insurance myself and I absorb the loss. I use this approach because very few of my packages get damaged. This practice is therefore more cost effective than insuring every single package through the post office or purchasing other types of insurance.
Fill
Fill is basically what you fill the empty space in the packages with. Traditionally, foam peanuts have been used for this purpose because they are both extremely light and crushable, meaning they absorb shocks very well. However, if you do a lot of shipping and have large packages you will need an awful lot of foam peanuts. This is not a problem if you can find a free source of supply by either recycling foam peanuts from packages you receive or if you can get peanuts from other people or companies who receive a lot of packages themselves.
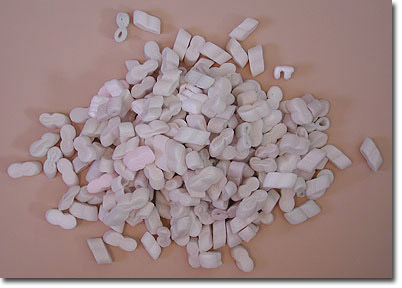
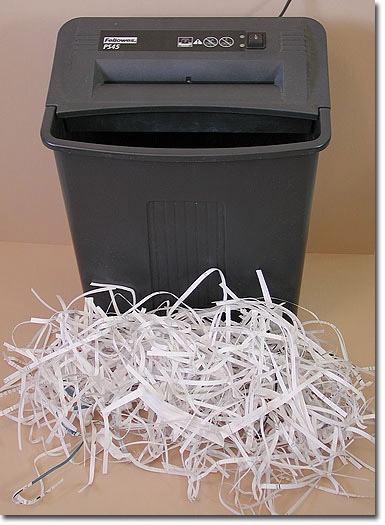
Of course, you can buy new foam peanuts. However, there is another solution and that is to make filling material yourself with a paper-shredder. There are two types of paper shredders, crosscut shredders and strip shredders. You need a strip shredder to make fill. Get one that sits on its own container so the strips go straight into this container. Then, just shred all the paperwork, newspaper and junk mail available and soon enough you will have more than enough fill for your packages! I have tried this approach last year after running out of foam peanuts and it worked great. Plus, if you are careful not to stuff the shredding too hard in the box it should be only slightly heavier than peanuts.
Labels
I use a variety of labels to indicate that the contents are fragile, that the package should not be bent, that there is glass inside and so on. I avoid using labels saying “Photographs” because in my opinion this makes the packages more noticeable and subject to theft.
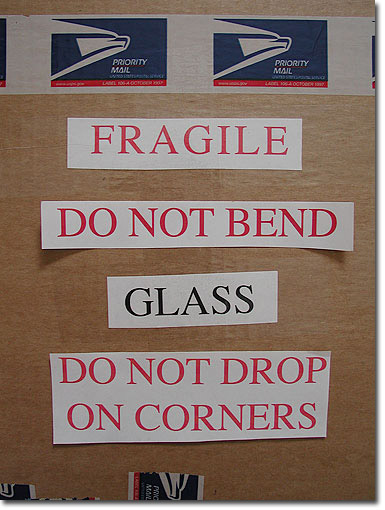
You can make your own warning labels in a layout or writing program using large red and black type for maximum visibility. This saves a little money and prevents you from having to order commercial labels. It also allows you to print only the quantity of labels that you need.
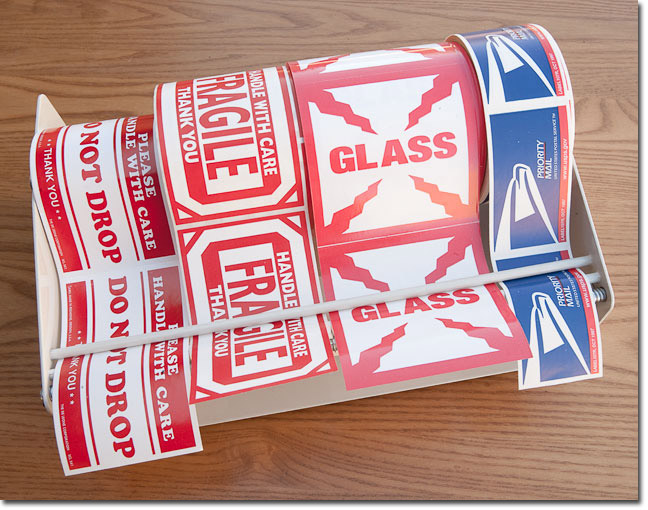
Commercially produced labels are widely available from companies that sell shipping supplies. Using ready-made labels will save you time when compared to making your own labels, they will look more professional and they will meet specific postal and shipping regulations.
These are the labels we use on most of our packages. The roll dispenser is very practical because it keeps the labels organized and makes them easy to pick up. The labels have an adhesive backing and the dispenser is designed to automatically peel off this support backing giving you labels that are ready to apply to packages.
Every little thing you can do to save time and make your life easier makes a difference. It all adds up to saving a lot of time and effort in the long run!
Packaging Your Artwork For Shipping
Now that we have looked at the materials and tools required for packing, it is time to look at how we are going to pack specific types of photographic products.
Because packing needs to be adapted to the artwork, different types of artwork will require different types of packing. In the instructions below I will proceed from simple to more complex packages.
Packing Unmated And Unframed Photographs
The easiest piece to package is an unframed and unmated photograph. Such an image is shipped rolled, in a sturdy 2” or 3” diameter tube.
First, inspect the artwork to make sure it is perfect in every respect. You don’t want to ship a piece which is damaged, dirty or has bent corners.
Second, roll the photograph in an oversize piece of interleave paper to protect it from scratching during shipping.
Third, take an oversize tube (4 inches or so longer than your wrapped photograph), cap one end with a plastic cap, and place some crumpled newspaper at the bottom of it so that the photograph is not in direct contact with the plastic cap. Place your photograph in the tube, add more newspaper at the top and close the tube with a second plastic cap.
Fourth, tape the two plastic end caps to the tube, just to make sure they won’t go anywhere, and attach the address label. Make sure the label has both the destination address and your own return address. I use custom made shipping labels with my return address preprinted on them so that all I have to do is write the destination address and tape the label to the package. I also add a “Fragile” label on the tube.
Packing A Matted But Unframed Photograph
The second easiest type of package is an unframed matted photograph. Because it is matted it has to be shipped flat but since there is no frame it can be shipped between multiple layers of cardboard rather than in a box thus reducing shipping weight (remember that shipping costs are calculated by weight).
First, inspect the piece to make sure it is perfect in every respect.
Second, take the matted photograph, make sure it is inside a crystal clear bag (see suppliers list) and that it has a thick backing board.
Third, cut two oversize pieces of stiff cardboard. These pieces of cardboard have to be about 1.5” larger than the mat size. For example, to ship an 11x14 matted photograph I will use two 12.5”x15.5” pieces of stiff cardboard. You can cut these pieces of cardboard with an X-Acto knife, on a mat cutter or on a wall cutter.
Fourth, take one of the two pieces of cardboard you just cut, put it under the bagged photograph, and tape each corner of the bagged photograph to it.
Fifth, take the second piece of cardboard, place it on top of the bagged photograph and tape the four sides of the two pieces of cardboard together. Make sure to close each side with tape so that no humidity can get in. You are in effect constructing a box inside which the photograph is protected.
Sixth, add cardboard corners in all 4 corners as extra protection and tape those to the package as well. I use corners which come as protection on ready-made frames and which I recycle for packaging. However, you can also purchase these corners in bulk for a minimal cost from framing supply stores (see suppliers list) or make your own from scrap pieces of cardboard.
Seventh, place the address label and the warning labels on the front of the package. I use labels saying “Fragile” and “Do Not Bend” on this type of package.
Packing A Framed Photograph
The third type of package consists of framed photographs. These packages can be divided in two categories: first, photographs framed with glass and second, photographs framed with Plexiglass. We use Plexiglass products designed specifically for framing such as TruVue, etc. Such products are actually better than glass because they add an extra layer of UV protection, they do not scratch, and they will not send glass shards flying towards your artwork in case the piece is dropped. Framing plexiglass products are widely used by museums and galleries. However, for ease of explanation and to not favor one manufacturer over another I use the generic term “plexiglass” in this book.
Plexiglass is lighter than glass and therefore less expensive to ship. Plexiglass will not break during shipping alleviating your worries a great deal. However, framing -quality plexiglass is more expensive than glass, and this cost has to be taken into account when pricing pieces framed with plexiglass. Finally, if you buy ready-made frames these frames will come with glass which makes shipping them that way easier and more cost efficient.
If you ship pieces framed with glass you have to add much more protection than if you ship pieces framed with plexiglass. I normally ship pieces framed with glass in sizes up to 22x28” framed size. When shipping larger pieces I use plexiglass knowing that glass is likely to break during shipping or that crating will be required in order to protect the glass. Finally, any framed piece shipped outside of the continental United States is framed with plexiglass. This is because the cost of shipping pieces framed with glass overseas is prohibitive due to their weight.
Here is my standard approach to packing a piece framed with glass:
First, inspect the piece for any defects and clean the glass. The piece must look perfect in every respect. This is true for any piece that you ship, not just one that is framed. However, it is particularly important to inspect a framed piece carefully because if dust is trapped under the glass or plexiglass, the customer will not be able to remove it.
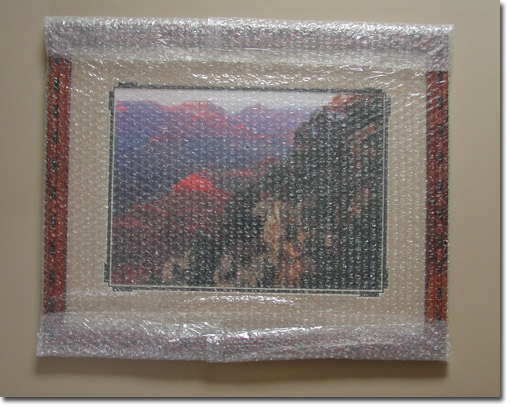
Second, wrap the piece in bubble wrap and tape the bubble wrap securely all around.
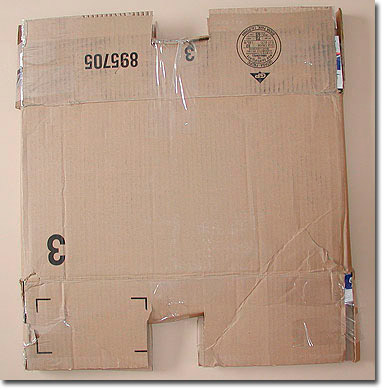
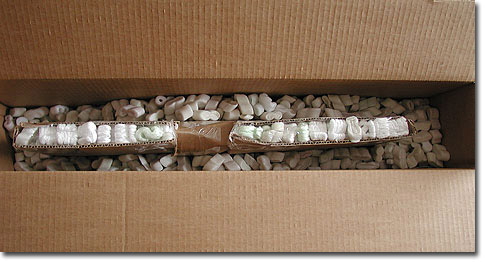
Third, completely wrap the bubbled-wrapped piece in an oversize piece of cardboard. Create crushable structures on all 4 corners and fill these structures with foam peanuts.

Fourth, place this package into an oversize box and place foam peanuts all around the piece. I like to have at lest 2 inches of space all around the piece. For example, a 16x20 frame will be shipped in a 20x30x5 box, a 22x28 frame in a 30x40x5 box and so on (the boxes I use are all 5 inches thick). Make sure to place a layer of peanuts at the bottom of the box prior to placing the piece in it, then, holding the piece in the center of the box, add foam peanuts to the sides and the top of the piece until it is totally surrounded with foam peanuts.
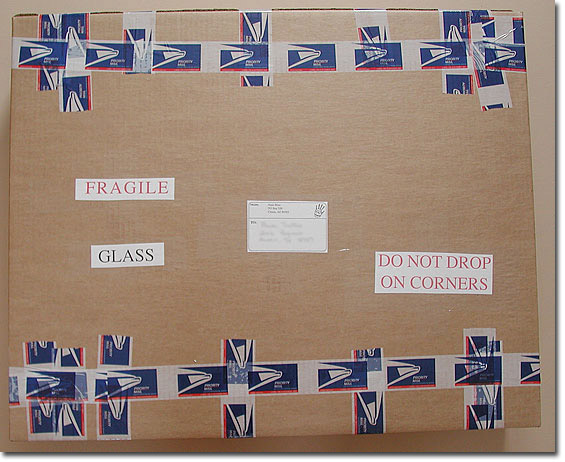
Fifth, tape the box shut with packing tape and place shipping and warning labels on the box. I use labels saying “Fragile,” “Glass,” and “Do Not Drop On Corners” on this type of package.
Notice: we routinely place up to two 16x20 or 22x28 frames in one 5” thick box. We place the two framed pieces face to face, meaning that the glass sides are facing each other. That way, it is virtually impossible to break the glass since only the back of the frame is exposed to lateral shocks.
Here is my standard approach to packing a piece framed with plexiglass:
To ship a piece framed with Plexiglas I follow the same approach as above except that no foam peanuts are used. First, inspect the piece to make sure that it is perfect in every way.
Second wrap the piece in bubble wrap and securely tape the bubble wrap.
Third, cut two pieces of cardboard to the size of the frame and tape one sheet on the front and one on the back of the frame. This step is very similar to packing a matted photograph as described above.
Fourth, place the piece in a box of same thickness as the packed frame (you do not need a 5” wide box). I normally use mat board boxes for shipping pieces framed with Plexiglas. They are the perfect size for up to a 32x40 piece, are very sturdy and have crushable structures at the top and bottom. I place the frame in the middle of the box and I add foam peanuts to the sides to form two additional crushing areas. I do not add foam peanuts to the front and back of the box. The front and back are protected with the sheets of cardboard as described in step 3.
Fifth, tape the box together and add shipping and warning labels. I add the same labels as for pieces framed in glass except, obviously, for the “Glass” label.
Conclusion
Packing your work so that it is protected during shipping is a crucial aspect of selling fine art. The sale is not complete until your work is in the hands of your customers. And, the sale is not complete unless your work arrives in perfect condition.
No one wants to receive a damaged or a broken work of art. If you do not pack your work well and it arrives damaged, you will get a lot of returns and complaints. This will increase both your workload and your stress level. It is much better to prevent having to fix these problems by taking the necessary time to pack your work carefully.
Comments on NPN fine art nature photography articles? Send them to the editor. NPN members may also log in and leave their comments below.
 Alain Briot creates fine art photographs, teaches workshops and offers DVD tutorials on composition, raw conversion, optimization, printing, marketing photographs and more. Alain is also the author of Mastering Landscape Photography and Mastering Photographic Composition, Creativity and Personal Style. Both books are available from Amazon and other bookstores as well from Alain’s website.
You can find more information about Alain's work, writings and tutorials as well as subscribe to Alain’s Free Monthly Newsletter on his website at http://www.beautiful-landscape.com. You will receive over 40 essays in PDF format, including chapters from Alain’s books, when you subscribe.