A RAW file is like raw sugar - it is unprocessed (and sweet!). Untouched, basic, linear digital information uninterpreted by software. Not very useful as it is but, more importantly, not locked into any file format or colour balance that might restrict its future use. Some people call a RAW file a 'digital negative' but it is considerably more than that.
A RAW file is a 'latent image' and is much more like an exposed but unprocessed B+W negative, as we'll see in a moment.
Now, bear with me a moment whilst I set the scene by very briefly looking at how good old film works.
Film
 Both traditional film and digital sensors in dSLRs capture light in a single exposure but the way they do this is quite different.
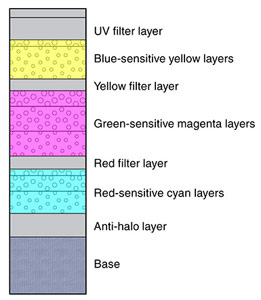
Sensitised transparency materials consist of an essentially random distribution of 'grains' which are chemically processed to reveal the dye couplers in different layers of the film. All films have slightly different responses to colours - Kodak films are often more neutral and Fuji films are more saturated and brighter.
Light is actually recorded in 3 different layers, each one dedicated to a particular range of wavelengths of light. Colour film can actually be thought of as 3 layers of B+W film with one of the 3 different primary additive colour dyes in each layer. Exposure to light chemically transforms the light sensitive grains into a latent image proportionate to the intensity of the light. During processing, the unused light sensitive chemicals are removed, revealing and leaving behind only the dyes. Each layer now consists of varying densities of one of the 3 additive primaries, Cyan, Magenta and Yellow. It is the combined effects of these colour dyes that gives us the illusion of Red Blue and Green 'slides'.
Film sensitivity is also more or less analogue, recording a continuous range of densities from maximum density, black, to minimum density or pure white.
Lastly, and this will become important later, the film is locked into a particular 'Colour Temperature' or White Balance where a neutral grey is only captured accurately at a specific colour temperature, typically 5500K for Daylight films. Low colour temperature scenes like indoor tungsten lights will always be recorded as very red, and open shade, with a high colour temperature, will be very cool.
OK, all of this is pretty well known to photographers, nothing new here, but read on...
Digital Sensors
Digital sensors on the other hand are actually a single layer of light sensitive 'photosites' arranged in a rigid rectangular matrix and these 'sites' capture information by generating a tiny voltage proportional to the intensity of the light which is projected onto them. This voltage or signal is converted into a digital value through internal firmware/software known as an Analogue/Digital Converter.
This sensor array captures an image in 12 'bits' of data - that's 4096 different shades of grey, from 0 (Black) to 4095 (White). Strictly speaking there is no black or white at this point, merely minimum signal and maximum signal. Simply put, the sensor, or photosite, measures the amount of light that hits it, and converts the resulting signal into a digital value from 0 to 4095. There is no colour information captured as such, just a simple 'grayscale' value representing the intensity of the light.
Colour
Most digital sensors only have one layer, unlike colour film that has at least 3 layers. So, where does the colour information come from?
To capture colour information each sensor has a single colour filter over it, either Red, Blue or Green. This is called a Bayer Array. Each sensor therefore captures the intensity of the Red or Blue or Green light that falls on it - only that single colour. A simple Bayer array is illustrated to the right.
 Note that this is a RGBG arrangement where there are 2 Green sensors for each Red and Blue one. This mimics our eyes' extra sensitivity to Green. There are also other arrangements of photosites, notably the rectangular ones of Nikon and the offset array in Fuji Super CDDs. The different types of sensors are another subject entirely and outside the scope of this article. It is worth briefly mentioning the Foveon chip which uses the colour film model and has 3 layers in each photosite, each photosite recording all 3 colours at the same time. Debate rages about the merits of this approach but it seems clear that the chip gives slightly better colour fidelity that the Bayer arrangement, with similar resolution. OK, back to simple sensors.
In its native form a RAW capture is quite useless for RGB viewing since each sensor or pixel only contains information on one colour - either Red, Green or Blue. Now comes the really clever bit. It is possible to 'guess' the missing colour data by looking at the values of the sensors surrounding one particular sensor and making intelligent predictions on what the other 2 colours should be. One colour value is, in effect, expanded to a full 3 colours by looking at what other colours are adjacent to that single sensor. It does seem like a big cheat, conjuring RGB colour data out of a grayscale image, but it actually works very well. The processing algorithms are very complex and are related to the specific chip's characteristics. Different algorithms work for different cameras and often camera manufacturers are very cagey about releasing all the characteristics of their proprietary sensors to third party software companies like Adobe and Phase One. By interpolating the colour information we now have 3 colours per photosite and so from 4096 grayscale values we now have 4096 x 4096 x 4096 different colours - that's 68,719,476,736, or 68.7 billion different colours.
The range of colour hues and saturations that a particular chip can capture is also important. This is known as the 'native device space' or the 'profile' of the camera and it can vary from one camera model to the next - it is a myth that digital cameras only capture into sRGB colourspace.
To recap: a RAW file is simply the 'crude' image capture data before any post processing has been done. All captured information is still fully available and can be processed in many different ways. Setting the camera to RAW simply turns off all in-camera processing like compression, sharpening, white balance and 12bit to 8bit conversions.
So, Why is RAW Capture a 'Good Thing'?
To illustrate the reasoning behind the advantages of a RAW workflow, let's wind the clock back to Ansel Adams days - remember the Zone System? Adams used to expand and contract the tonal range of a negative by different processing. This allowed him to deal with different contrast scenes in a predictable way by varying the processing of the negatives, more exposure and less processing gives a low contrast neg, and vice versa. Using RAW workflow is rather like the difference between standard B+W processing in Kodak D76 and very subtle B+W developing using advanced techniques like super dilute HC110 or even home made solutions. Sure, it's more work and there are many new things to learn but you end up with more control and greater subtlety in your work.
When you set the camera to RAW you keep all your options open so you can make decisions later about the colour balance, file size, sharpening etc. By shooting in JPEG mode you are locking in a set of broad parameters with no possibility of changing your mind later. This is why I think of a RAW file as an unprocessed digital negative - you can make choices about the processing later. If this all sounds too good to be true, OK, it is also true that there is a price to pay for all this extra versatility.
Basic Pro and Cons
Pros;
- Access to the full Bit Depth (12) of the camera so much better shadow detail and control of highlights is possible. No information is lost by processing in the camera. JPEGs are 8 bit images so in a sense you are picking out the best 256 levels out of 4096 and throwing the rest away - forever!
- Colour interpolation is not done in camera and so more sophisticated processing is possible on a PC.
- Full control over ALL settings like white balance, sharpening, compression etc. Camera settings are very generic - a blunt instrument vs. a scalpel.
- No Compression artifacts. Post processed files are TIFFs which offer superior archival characteristic to JPEGs.
- Digital 'negative' so files can be re-processed for different uses. Good for archiving.
- Access to the full colour gamut of the capture since the native colour space of the camera is often greater than generic sRGB.
- Exposure 'mistakes' can be far better corrected. Not by stretching the 8bit data using levels and curves in PS, but by reinterpreting the original 12bit data.
- It is even possible to process the same capture in two different ways - one for highlights, one for shadows, and then combining the two for an expanded tonal range.
Cons;
|
- Bigger file size on card, typically averaging about the same file size as the megapixel rating of the camera; thus less images on a card than using JPEGs. However files can be up to 1.5 time the pixel count due to the 12bit nature of the capture. Complex subjects allow little lossless compression so expect RAW files from a 6Mp camera to vary from 5Mb to 9Mb.
- Slower write times and less sequential shooting - The Canon 1D Mk11 allows up to 44 shots in Fine JPEG but 'only' 20 on RAW.
- All RAW files require post processing to make the files into a useful format, which takes up valuable time. JPEGs are available immediately and this is good for press and sports who often transmit the images to a photo editor as they are shot.
- Difficulty of learning the whole RAW workflow - it takes time to learn valuable new skills.
On balance I think the pros outweigh the cons, particularly for the sort of work I do.
For news shooters this RAW workflow is probably not really necessary - I remember working with some Associated Press guys in Fremantle during the America's Cup in 1987. They were shooting B+W film (Tri X) processed as fast as possible in a standard Kodak automatic roller processor, and they would even put the negs in the enlarger wet when they had a very tight wire service deadline. The prints were 'good enough' to be successfully wired. However, when shooting feature work with looser deadlines some of those guys would carefully hand process and print every image personally, and of course got a higher quality finished print.
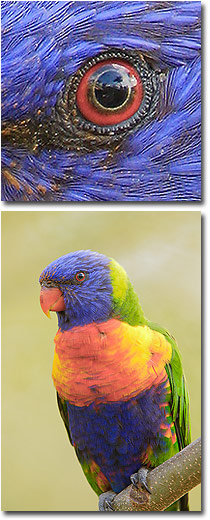
Shooting and processing RAW is exactly like this - the more effort you put in to the digital process, the more you get out. It is quite possible to get amazing results from a simple 6Mb D60 like I use. With a bit of care I have a printed a close-up of a Rainbow Lorikeet at 30"x20" and every feather was sharp, way better than from 35mm film, even using Fuji Provia and a high end scanner.
The difference between this and the same shot using default JPEG setting was marked, easily visible to the untrained eye. However, it took a lot more work than simply shooting the image on auto but the results made it worthwhile. I have also taken files from the high-end Canon 1DsMk2 and made visually superior prints up to 24"x16" even compared to 6x9 cm film scanned on a Flextight ! Only the careful RAW process control made this possible.
If it's worth doing it's worth doing well.
Exposure is Critical!
Once you have decided to use the RAW workflow you need to make some slight adjustments to the way you shoot in order to get the most out of the technique. Just like shooting transparency film, the exposure is quite critical to get the most out of the capture - RAW can be a forgiving method in some ways, but it is highly unforgiving of incorrect exposure if you are looking to get the absolute best quality possible.
Exposure, and the ISO setting on the camera, is really the only thing that affects a RAW capture, all the other settings on the camera are simply written into the EXIF data that goes with the file. These other settings can be used by the RAW conversion software, but they can also be completely ignored.
The information captured by a digital camera is not distributed evenly across the tonal range from Black to White, far from it. The native sensor has a reasonably linear response to light but of course the way our eyes work and the exposure system of cameras is based on the logarithmic scale, open up one stop and you are allowing double the light to fall on the sensor. Three stops is 8 times the light and five stops 32 times, etc. This means that the tones between pure White and one stop less, actually contain fully half of the tonal range of the capture. Each stop below that contains progressively half the tones - as explained in the diagram below.
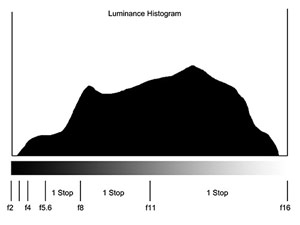 Assuming a tonal range of 5 stops and a 12 bit image:
- Within the first F/Stop, which contains the brightest tones, 2048 levels available
- Within the second F/Stop, which contains bright tones, 1024 levels available
- Within the third F/Stop, which contains the mid-tones, 512 levels available
- Within the fourth F/Stop, which contains dark tones, 256 levels available
- Within the fifth F/Stop, which contains the darkest tones, 128 levels available
Just take a moment to think what this means. If your exposure is just 1 stop off, you will have lost fully half of the available tones, using only 2048 to cover the tonal range of the subject.
The solution is to use the histogram on the back of the camera and make sure the exposure uses the full width of the histogram. The brightest tones should be just touching the right hand side of the histogram, but not overexposing (set the flashing overexposure warning to show blown highlights). This is know as 'exposing to the right' and is very much like the 'expose for the highlights' method when using transparency film.
 |
Highlights
Having 2048 levels of tonal detail in the brightest areas of the image means that digital captures can hold the most amazingly subtle highlights. This is why good digital images of high-key subjects can be so superior to film, particularly negative film. Remember, with negative film, the highlights are recorded in the densest parts of the neg, not the thinnest, like in transparency film. Scanners have great difficulty distinguishing the tones of the highlights from the base density of the film - this is known as a low signal to noise ratio. With digital captures, and transparency film, this low S/N ratio exists in the shadows where it is possible to have less information and still get a great print. This is why transparency film usually scans so much better than negative film.
Shadows
Another consequence of this ever reducing scale of data is that there are so few tones available in the shadows on an image - 128 in the 5th Stop range. This means that there is a limit on how much shadow detail can be opened up; those 128 levels can only be stretched so far. Even more than that, imagine working only in 8Bit JPEGs - those shadows will only be represented by 32 levels, not very much at all. That's another pretty good demonstration of how RAW capture can be used to maximise print quality.
More on Exposure
Simplifying slightly, the response of a digital sensor to increasing light intensity is mostly linear, a plot of signal strength vs. light intensity gives a straight line. Film on the other hand has the classic s-shaped curve response with a toe, a midtone straight line and a shoulder. This means that as the light intensity approached maximum or minimum, the density of the film changes slower and slower, falling off in a smooth way to maximum or minimum density. Digital sensors on the other hand stop and start their response abruptly - if the light intensity goes above or below a certain amount the sensor clips it at that amount. No more tone detail is possible. This means that overexposure is final - all detail over a certain level is lost. This reinforces the necessity to expose for the highlights.
The Limits of the Histogram Display
All good digital cameras have some sort of histogram display available in Review mode. However, not that many have a display that shows each channel of colour separately, they are limited to the overall luminance of the scene which represents an average of the 3 channels. Thus the display does not show when one colour is clipping or falling outside the native colourspace of the camera. This means that whilst Expose to the Right is a good starting point, if the subject has large areas of saturated colour which contains important tonal differences, then it would be best to heave a bit of headroom for the saturated colours to record properly. The camera histogram is not a true display of this, so experience and lots of viewing in Photoshop Camera Raw or Capture One is needed to get a feel for this.
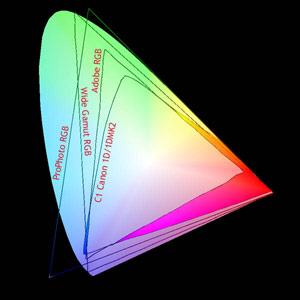
One other facet of camera histograms is that since parts of the native colourspace of the camera can be quite a bit larger than even Adobe RGB, colours can be clipped in post-processing when a smaller working space is used unless care is taken to avoid this.
|
Once processed into a bigger space, Images can then be converted back into a more 'normal' space by using Photoshop's Mode/Convert to Profile options or left in the bigger space for later conversion to a specific device. Many top digital photographers are converting RAW files into 16Bit ProPhotoRGB for archiving. They reason that such a file contains every last drop of information captured by the camera and no limits are being imposed on what the file may be used for in the future.
A word of caution here, ProPhotoRGB is very large and there are some subtle downsides to using it unless you know exactly what you are doing. If in doubt, use AdobeRGB. What you might lose in extreme colours you will probably never miss, and it is a very well balanced space with a genuine neutral midpoint that also translates well to CMYK.
Geeky Aside: One almost undocumented feature of profile to profile conversion that is that if you convert to a device space, like when you print to a colour managed printer, you get the options of different rending intents, Perceptual, Relative Colorimetric etc. However, when you convert from one working space to another, you seem to get the same options in Photoshop but 'under the hood' the conversion is done only by a Relative Colorimetric conversion, not Perceptual. This is where one problem can arise with ProPhotoRGB, if you then simply convert to sRGB you end up clipping off the supersaturated colours and you end up back where you started if you had converted into sRGB in the first place!
OK, so that's what RAW files are, and hopefully I have demonstrated why the RAW workflow can lead to finer control of your digital images. Yes, it's more work, but you can squeeze so much more visual information out of a capture that it is well worthwhile. You have spent serious dollars on the hardware; why not realize its full potential?
NR-NPN 1005
Comments on NPN nature photography articles? Send them to the editor.
Nick Rains is a full time professional photographer who resides in Australia. View more of Nick's work in his online portfolios and on his website at www.nickrains.com.