Taking a great water reflection image requires your camera to be perfectly level. No matter how hard you try – tripod leveling base, bubble level, etc. – you will get some that aren’t perfect. This is when the Photoshop “Measure Tool” comes to the rescue.
|
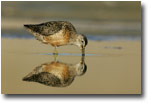
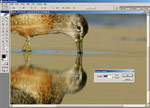
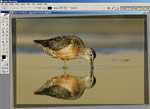
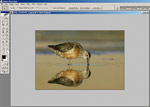
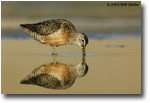
Photo 1 is an example of a reflection image that’s not quite level. After some minor image adjustments (brightness, contrast), it’s time to level and crop. The Photoshop Measure Tool makes this task easy. You’ll find this tool under the Eyedropper Tool, just left click and hold down to get the tool choices to pop up. Select the Measure Tool at the bottom. Where to measure is probably the hardest part of the process. If you have relatively flat water, pretty much any feature that is well defined in both the primary and reflection can be used. If you have a good catchlight in the reflection, that is the most accurate feature.
The Measure Tool is similar to any line drawing tool. Zoom in on your image until the two features you wish to align are large in the window. Move the cross to the primary feature, left click, hold, and drag the line to the reflected feature (Photo 2). Note: If you hold the Shift key down, the measuring line will be constrained to a perfect vertical line – a useful feature for checking your image quickly for level. The next step is to select Image>Rotate Canvas>Arbitrary… The magic of this tool becomes evident here as the exact amount of rotation and direction necessary is already programmed into the Rotate Canvas box. Just click OK and your image is level.
At this point, the outside edges of your canvas are no longer level and you’ll need to do some cropping to correct this (Photo 3). Here I’m using the Crop Tool constrained to the original 3:2 proportions, and doing a tiny bit of creative cropping to eliminate some unnecessary negative space on the sides of the image.
While were here, lets discuss sharpening for a water reflection image. This discussion will apply specifically to a photo sized for web posting. Sharpening for the web should be done last, after all other adjustments and final sizing. Selective sharpening is a technique used to avoid enhancing noise in large out of focus (OOF) areas. Selective sharpening for the typical bird photo would include sharpening the bird and any perch that was within reasonable focus. It would exclude large areas of OOF background. In a water image, there can be some features in the water that you want to sharpen – ripples that are near the focus plane of the subject. There is usually no reason to sharpen the reflection since it is typically well outside the depth of field for the image. Using a combination of the Magic Wand Tool and the Lasso Tool, I’ve selected the primary subject and those ripples in the water that are in focus (Photo 4). Start with the Magic Wand Tool at a Tolerance of about 10. Shift+Left Click in the open areas of the water until the entire primary subject is surrounded. Use the Lasso Tool to grab the reflection and any remaining bits of water. Inverse the selection (Shift+Ctrl+I). Finally, with the Shift key held down, use the Lasso Tool to surround the ripples in the water you want sharpened. The image is ready for the sharpening method of your choice. The Unsharp Mask filter (USM) works well for web sized images. My typical sharpening routine applies multiple application of USM in small amounts. With USM settings of Amount – 100, Radius – 0.2, and Threshold – 0, I apply the filter 5 or 6 times. Note: Ctrl+F will repeat your last filter, in this case USM after the initial application. If you need a small amount of additional selective sharpening for specific areas (like the eye of your subject), use the Sharpening Tool with a soft edge brush, strength 50%, sized slightly larger than the spot you want to apply it to.
Using the tools available in Photoshop, we can improve an image with a minor problem, and make a good image even better (Photo 5).
RS-NPN 0252
Comments on NPN bird photography articles? Send them to the editor.
Bob Steele has been involved in birding and bird photography for nearly 20 years. In the past few years, bird photography has become his passion. He is also a full-time engineer with the U.S. Navy. Bob lives in the bird-rich Kern County, California. This area is centrally located at the convergence of multiple bio-regions, giving him the opportunity to photograph many avian subjects. Visit Bob's website at www.bobsteelephoto.com.