Composing With Light - Part 4 |
Editor's note: This is Part 4 of 4 installments.
Silhouettes
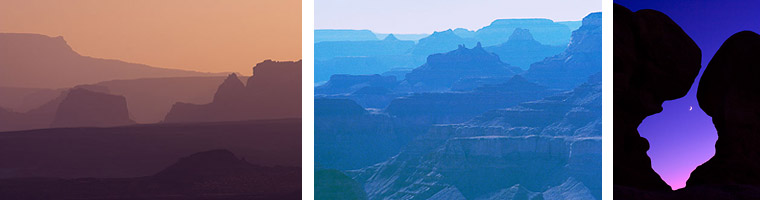
Three examples of silhouettes
Using silhouettes is a very effective way of composing strong photographs. A silhouette is an object reduced to the shape of its outline. When rendered as a silhouette, a complex subject becomes a simple outline. The body of a silhouette is usually of a solid color. Many photographers like to use black silhouettes. However, silhouettes can be any color you want. When non-black silhouettes are used, several silhouettes of different colors can be superimposed onto each other. This superimposition creates a series of shapes that differ from one another by their outlines and by their colors.
Silhouettes are by definition flat. Therefore, depth is created by placing several silhouettes in front of each other. The closest silhouettes have dark colors and the farthest silhouettes have light colors. Usually this darkening and lightening occurs naturally. Objects in the distance become lighter and lighter the further away they are, thereby creating the impression of depth.
A color silhouette photograph, such as the examples at left and center above, is comparable to a paper collage. In a silhouette collage, shapes are cut out of paper of different colors and then superimposed onto each other. The darkest shapes are placed in the foreground and the lightest shapes in the background. The change from dark to light colors is what gives depth to the image. The different shapes of the silhouettes are what create variety and interest in the image.
Because silhouettes have a strong visual presence they are very effective in photography. Silhouettes simplify complex subjects. Very often less is more in art and in photography. When using silhouettes, we show less of the subject and by showing less we create images that are simpler and, if done well, stronger as well.
Silhouettes also lend themselves to a simplification of the color palette. Often, hazy conditions will naturally create silhouettes. This is what happened in the photographs at left and center above. These silhouettes are often monochromatic in color, meaning they have only one color. The natural color of the silhouettes can be kept, or it can be changed to a different color. For example, in the image above at left, I kept the natural beige color of the silhouette. However, in the image at center above I changed the natural color, which was also beige, to a light blue.
In both examples, the simplified monochromatic color palettes of these two scenes are in harmony with the simplified shapes of the subject. The result is an image that is reduced to its main components of shapes and color.
Silhouettes can also be created at sunrise and sunset by placing an element in front of the sky and reducing this element to pure black. This treatment was made popular with color transparency film that had a very small dynamic range and which therefore increased contrast dramatically. This made creating black silhouettes easy. With digital, if you want black silhouettes you may have to force the foreground elements to black since they may retain details and colors that you do not wish to show.
This is what I did with the photograph at right above. This photograph was taken at sunset as the moon was rising. The two black rock formations create an arrowhead shape and appear to be a single rock. However, in reality these are two separate rock formations located in front of another but reducing them to black silhouettes makes them appear to be on the same plane. The rising moon adds another level of interest to the image while the sky color, transitioning from purple to dark blue, adds a dash of color that sharply contrasts with the black foreground. The image is simple yet powerful and memorable, in large part because of its simplicity, both in terms of the elements and of the colors present in it.
Sunrise & Sunset Light
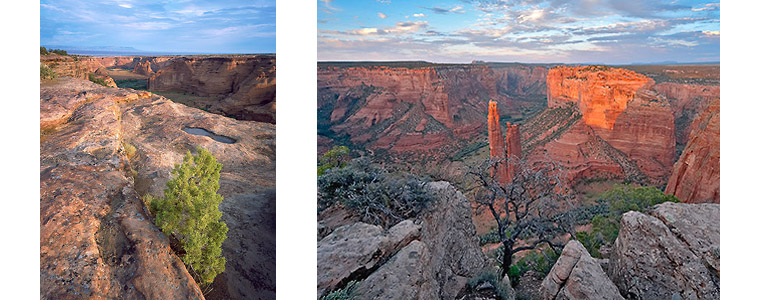
Sunrise (left) and sunset (right), Canyon de Chelly
I have talked about sunrise and sunset light on several occasions in these examples, and I therefore hesitated to add a section specifically about sunrise and sunset. Yet I did, because I had things to add that I did not talk about in the other sections.
The first of these things is that there is no expectable light that is as dramatic and colorful as the light of sunrise and sunset. I say “expectable” because other lighting conditions are as dramatic as sunrise and sunset. However, they are not “expectable” because they cannot be expected to happen every day the way sunrise and sunset do. Rainbows, storms and lightning are three examples of extremely dramatic lighting situations. However, they happen unexpectedly therefore one cannot plan when to photograph them.
The second thing is the terminology used when we talk about sunrise and sunset. Because the sun rises and sets on the horizon, (except when mountains block the sunlight) the light of sunrise and sunset is often referred to as horizontal light. Sunset and sunrise light is horizontal because the sun shines on a horizontal plane. The horizontal quality of the light is what makes this light outline the texture of objects so well. In the example at left above, Sunrise at Canyon de Chelly, the foreground rock, which is the rim of Canyon de Chelly, would be far from being interesting if it was photographed at midday. However, photographed at sunrise it becomes a wealth of details, textures and colors all created and outlined by the horizontal light of sunrise.
Horizontal light grazes the objects in the scene, revealing every detail of their texture in ways no other type of light can reveal better.
The example below shows particularly well how grazing light reveals texture. I took these two photographs in my house, in my stairway to be specific, using the wall texture as the subject. The reason why I took them is because I noticed that in late afternoon the sun grazes the surface of one of the walls, revealing the wall texture in ways that surprised me. The light made it look as if the wall texture was 1/2 of an inch deep, or even deeper than that, while in reality it is barely 1/16th of an inch. If you pass your hand on the texture you can barely feel it, yet in grazing light it looked as if we were looking at a very rough texture.
I then took a second photograph when the same surface was in open shade, without any direct light. This is the same exact wall, facing in the same exact direction as the first photograph. The color balance and the conversion settings are also the same for both photographs. The only difference is the light: grazing light in the first photograph and open shade in the second photograph.
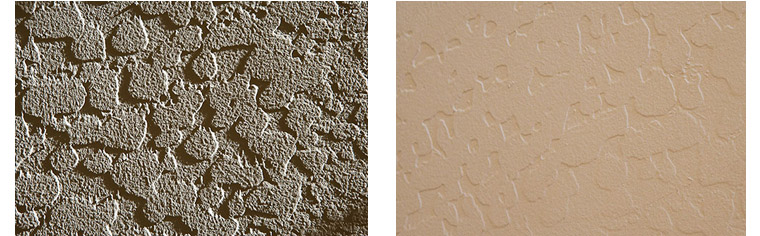
Grazing light (left) and open shade (right)
The hour before and after sunrise and sunset is the time of day when the light is the most colorful, dramatic and horizontal. Some photographers call it “the magic hour”. Others call it “show time,” the time at which photographers go to work to capture nature’s light show. To me this is one of the finest lights for photography. Even if it lasts only about an hour, that hour is worth waiting for all day. However, you have to work fast because sunset and sunrise light changes rapidly. Often, after photographing sunrise or sunset, when I start to organize equipment left amiss from the flurry of activity that accompanies an exciting shoot, I ask Natalie, “did I get it?” meaning “did I capture the peak of sunrise or sunset light on a photograph?” Most likely I did, and most likely on many frames, but the event seems to have happened so quickly that I cannot say for sure. I become so absorbed in capturing this event that when it is over I cannot precisely remember how many photographs I took or which exact compositions I created. With film I had to wait weeks before seeing the results of my efforts. With digital looking at the photographs on the LCD screens answers my question
Snow
Snow has a significant impact on the lighting of a scene. On a sunny day, snow on the ground reflects direct sunlight. In doing so, snow acts as a giant reflector, bouncing light into the shadows and reducing contrast. A snow scene takes on a high brightness level that the same scene without snow would never have.
On overcast days snow provides a white background on which dark objects can be outlined. This white background also provides a neutral-color backdrop.
Snow simplifies compositions by hiding elements. After a snowstorm, a lot of details and features that would normally be visually distracting are hidden under the snow. Snow also softens the contour of objects, making harsh edges and sharp lines look soft and rounded.
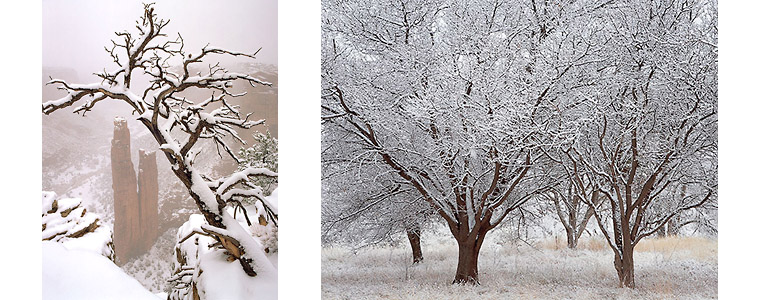
Spiderock in Snowstorm (left) and Trees with Fresh Snow (right)
Snow can create unusual visual patterns. For example, in the two examples above, Spiderock in Snowstorm and Trees with Fresh Snow, the snow is an integral component of the composition. If there had been no snow when I created these photographs, I would have composed them very differently. The presence of snow offered opportunities that a snow-less landscape would not offer. In Trees after Fresh Snow, the snow gave a lace-like quality to the tree branches. The contrast between the tree trunks, which had no snow, and the branches, which were covered with snow, was also visually striking. I decided to not include any sky in this image because the photograph is about what is happening within the world of the snow-covered trees.
I also decided to keep the photograph in color and not make it black and white, even though it was naturally very close to being black and white. I took this decision because I wanted to preserve the little bit of yellow in the grasses and the faint red-brown hue of the tree trunks. The presence of these two colors adds a dimension to the image that a pure black and white image would not have. In short, it adds another layer of interest to the image. Having multiple layers of interest in a composition makes the photograph more interesting and more sophisticated.
These two images were both taken on overcast days. Spiderock in Snowstorm was actually taken during a snowstorm, while Trees after Snowstorm was taken the morning after a snowstorm.
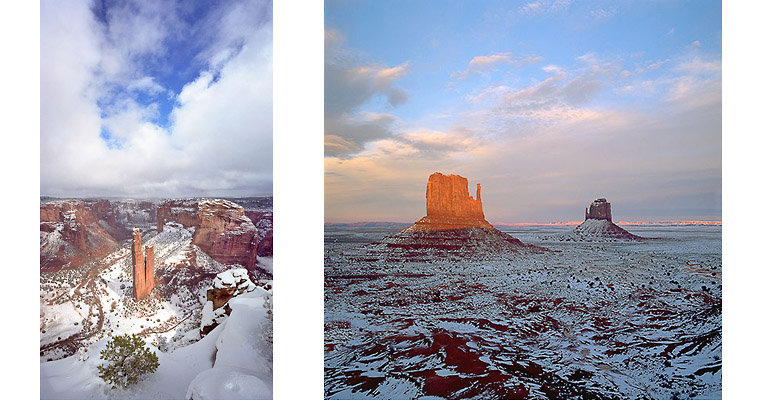
Clearing Snowstorm (left) and Sunset with Snow
The two other examples, Clearing Snowstorm and Sunset with Snow, were taken when the sun was out and shining on parts of the scene. Clearing Snowstorm was taken in mid afternoon while Sunset with Snow was taken at sunset, close to the winter solstice.
Both photographs offer interesting opportunities for remarks about snow and light. Clearing Snowstorm was taken around noon and demonstrates that in winter it is possible to take good photographs during daytime, hours after sunrise and hours before sunset. This is because in winter the sun stays low in the sky all day long, providing us with good light all day long. A photograph of the same scene taken at noon in the summer would be far less attractive and colorful. In the summer the sun would be high up in the sky, shining straight down, while in the winter the sun shines at a low angle for most of the day.
In this photograph the snow on the ground acts as a giant natural reflector that bounces light into the shadows, filling these shadows with additional light. This makes the shadows much brighter and colorful than on a snow-less day. It also lowers the contrast of the entire scene by brightening the shadows.
In this photograph the presence of snow on the ground provides a neutral color that further emphasizes the contrast of light and color. When you have a neutral color in the landscape, the other saturated colors seem much more colorful than if they were surrounded by other saturated colors. The white snow, provides a neutral color for us to look at, an opportunity for comparing areas with color and areas without color.
Sunset with snow is also very interesting. It depicts one of the many unique lighting situations found at Monument Valley. In the winter, just before and after the winter solstice, the sun sets behind the mesa to the right of the main Monument Valley overlook. Just before sunset the shadow of that mesa blocks the sun, preventing it from reaching the Right Mitten. At that time only the Left Mitten is in direct sunlight, making for an interesting visual contrast with one mitten in the light and the other in the shade.
I did not make the snow totally white in this image. Instead, I left a hint of blue in it. I could have made the snow pure white, thereby reinforcing the color contrast further, but I wanted to create a color relationship between the blue sky and the blue snow.
Snow transforms the appearance of the landscape. Snow creates shapes that will disappear when it melts, shapes you will be the only one to have if you photographed them.
In snow scenes, white becomes the dominant color. Remember that no two whites are exactly the same color. If you doubt this, pick up two pieces of white paper. Make sure they each come from a different source (not from the same ream of paper). Lay these two pieces of white paper on top of each other. You will see a difference of color between them. Each piece of white paper has a slightly different shade of white. Some whites are yellowish while others are bluish. Some may even have a magenta cast. White is a color and no two whites are exactly similar.
Rainbows
Rainbows offer unique opportunities for photography. However, these opportunities are fleeting and unpredictable. Photographing a rainbow cannot be planned because the occurrence of a rainbow depends on the combined presence of two elusive elements: rain and sunshine. If you want a truly impressive rainbow photograph, you also need a third element: sunset light. I could also say sunrise light, but I have not seen a rainbow at sunrise yet. I have no doubt it can happen, it’s just not something I have witnessed myself.
In Arizona, where the three photographs of rainbows above were taken, we have a season called the Monsoons that takes place in August and September. Some years, the monsoons occur like clockwork, everyday at the same time, seemingly following a natural schedule. During the Monsoon season, storm clouds build during the day, starting around midday to early afternoon. In late afternoon, the cloud-building process reaches its peak and it starts to rain. The rain quickly gets heavy and sometimes lightning strikes occur during this rainstorm. Then, just as suddenly as it started, the rain stops, the clouds open up and the sun shines again.
This brief transitory time between when the sun comes out and when the rain stops is when rainbows appear. If you are lucky, the clouds part just before sunset to let the sunset light shine through, creating a rainbow with sunset colors in the clouds and on the landscape. Those rainbows are the best! The images at extreme left and extreme right above were both created at sunset. When I took these two photographs, the clouds opened just long enough to let the sun shine through in the West while a rainbow formed in the East. At that time, sunset colors, for a brief moment filled the canyon with warm saturated light.
These unique photographic opportunities last only an instant --a few minutes at most-- and one must be ready to photograph when they occur. This is not the time to fumble with your camera settings, or to hesitate about which lens to use. This is the time to shoot now and sort it all out later. These fantastic scenes may seem eternal but they will be gone in an instant, never to come back in quite the same way again.
Rainbows are formed by the sunlight hitting droplets of water in the air. The droplets of water act as optical prisms, splitting the light into all the colors of the visible spectrum. Two things are therefore required: rain and sunlight. Rene Descartes in the Discours de la Methode, which was published in 1637, offered the first scientific explanation of this phenomenon. Prior to Descartes it was believed that rainbows were magical events and their occurrence was the source of numerous myths and stories.
Rainbows are always located at the exact opposite of the sun. That is, if the sun is in the West, at sunset for example, rainbows will form in the East. Elevation-wise, rainbows will also be located at the exact opposite elevation of the sun. So, for example, if the sun is low on the horizon, as it is at sunset, the rainbow will be high up in the sky. On the opposite, if the sun is high above the horizon, then the rainbow will be low in the sky. The photographs above at right and left were both taken at sunset, when the sun was just above the horizon, and as a result the rainbows are high up in the sky.
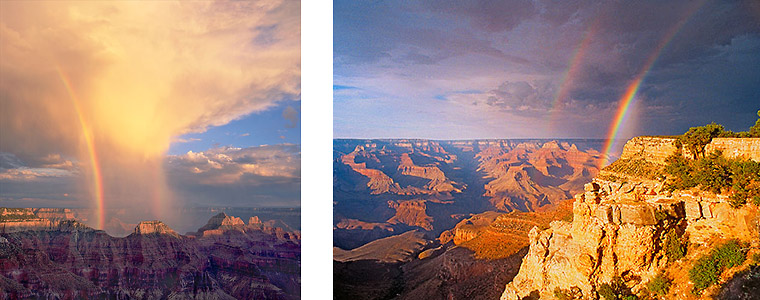
Examples of rainbows
These photographs were all taken with medium telephoto lenses and show only part of the rainbow. Rainbows are circular, however, because they occur on the opposite side of the sun, only the upper half of the rainbow circle is visible, except if you can see below the horizon. How can you do that? When you are standing on top of a mountain looking down into a valley for example, or when you are standing on the rim of the Grand Canyon looking down into the abyss. The Grand Canyon is a mile deep, therefore rainbows can form below the horizon if they extend to the bottom of the canyon. This happens regularly when the sun shines around mid-day during a rainstorm. In fact all three photographs above show part of the rainbow extending down into the Grand Canyon. They do not show the whole rainbow because this being sunset the sun is not shining deep enough in the gorge to show the entire rainbow.
These photographs show very vivid colors in the rainbows. This is due to the use of a polarizing filter. Polarizing filters darken the sky and also darken the colors of the rainbow. In fact, besides being there when a rainbow occurs and having your camera ready, having a polarizing filter with you is the most important accessory. Without a polarizing filter most rainbow photographs will have weak and washed out colors. To intensify the colors of a rainbow you need to use a polarizing filter on your lens. Simply rotate this filter until you get the maximum polarization, and all of a sudden the colors will become bright and vivid and the rainbow will be sharply visible. This is because natural light is by nature scattered. What this means is that natural light shines in every direction. When you use a polarizing filter you polarize the light, meaning that you make the light shine in a single direction. Doing so increases colors. It works particularly well with rainbows.
The last thing to keep in mind in regards to rainbows is that a full rainbow is circular and is therefore 180 degrees wide. Because of this extreme width, the only way to photograph a full rainbow in a single frame is by having a lens able to cover a 180 degrees field of view. Such lenses are called fish eyes and unless you have one you will be limited to photographing only part of the rainbow, or you will have to take several photographs and collage them together to show the entire rainbow in a single photograph.
However, most of the time you do not want the full rainbow. In fact, at Grand Canyon it is rare that the full rainbow is located over the canyon. Usually, one half or so is over the canyon and the other half is over the rim. In the photographs above I chose to show only the part of the rainbow located over the canyon. If you look carefully at the photographs above, you will see that in the middle photograph I captured the right side of the rainbow, while on the photographs at extreme right and left I captured the left side of the rainbow. This is because in the middle photograph I was on the South rim of Grand Canyon looking north, while in the two other photographs I was on the North Rim of Grand Canyon looking south. Since all three photographs were taken at sunset, I captured a different side of the rainbow depending on which rim I was photographing from.
Rainbows are dynamic compositional elements. Their shape, color, direction and height, as well as the shape and size of the clouds around them, offer unique creative possibilities for the composition of a photograph. For example, with a tall rainbow you will have to include more sky than you would with a short rainbow. If the clouds are particularly interesting, you may want to include clouds above the rainbow as well. These are just two possibilities among many offered by rainbows.
The curve of a rainbow is a very dynamic element. This curve forms a C shape, one of the most dynamic shapes you can find in nature. It is almost as dynamic as an S curve. Always photograph C shapes and always photograph S curves. And, always photograph rainbows as well!
Light Shafts
Light shafts provide unique photographic opportunities because they occur in places that are by definition dark. Even though they may look very bright, light shafts are actually not all that bright. It is the darkness that surrounds them that makes them stand out.
Light shafts can occur in a variety of locations. However, for a light shaft to be visible three conditions are necessary. First, you have to have direct sunlight reaching that location. Second, the ambient light must be dark enough for the light shaft to be visible. Third, and most important, you have to have dust, sand, smoke or other particulates suspended in the air. This third condition is an absolute requirement. Without it the light shaft will not be visible. If you don’t have particulates in the air all you will see is a spot of light on the floor, showing where the light shaft ends, and that’s all.
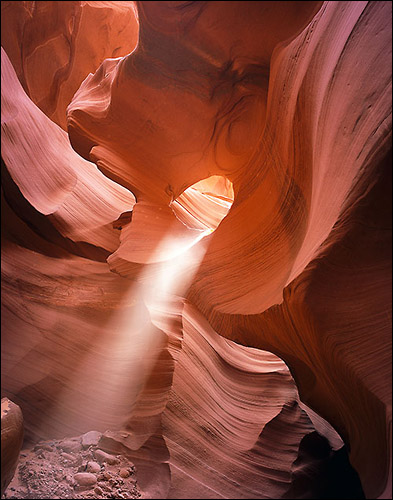
Light shaft
Light is by nature invisible. The world is filled with sunlight during daytime and yet we do not see any rays of sunlight. All we see is ambient light. To see light itself something has to be in the air so that when light strikes the particles, light becomes visible. This is what happens with rainbows. When the light strikes the droplets of water, the spectrum of colors becomes visible.
With light shafts you need dust, sand, smoke or other particulates to make the light visible. When the light strikes the particles of dust or sand, the light becomes visible and the light shaft appears. Without these particles floating in the air, all you will see is a spot of light on the floor or nothing at all.
In slot canyons, light shafts can occur naturally on a windy day if sand is floating in the air, carried upwards by the wind. But how do you make a light shaft appear in a slot canyon when no dust or sand is floating in the air? Simple. You take a handful of sand and you throw it up in the air into the location of the light shaft. As soon as the sand or the dust is in the air, the light strikes the sand particles and as if by magic a light shaft appears in front of your eyes. With practice you will learn exactly how much sand you need to throw, as well as how high you need to throw it, to create the perfect light shaft.
If there is an upward air draft in the location of the light shaft, you can kick sand with your feet to make it rise towards the light shaft. In that case you do not need to throw sand. The air current will take care of carrying the sand into the light shaft. This works only when the air is blowing upwards, which is not always the case. The rest of the time you need to rely on the true and tested “sand throwing” method!
Light shafts add an exciting visual element to your compositions. They are dynamic compositional elements that are both intangible and ever changing. Because they form straight lines, they can be used as leading lines or as diagonal lines. They can even be used to show perspective since the far end of the light shaft is narrower than the nearby end.
Comments on NPN landscape photography articles? Send them to the editor. NPN members may also log in and leave their comments below.
Alain Briot creates Fine Art Photographs, writes books, teaches workshops and publishes DVD tutorials on composition, printing and marketing photographs. You can find more information about Alain's work, writings and tutorials on his website at http://www.beautiful-landscape.com You can also subscribe to Alain's Free Monthly Newsletter. You will receive 40 free essays written by Alain when you subscribe.