Over the years I have seen that there are two main problem areas for most photographers: exposure and composition. Getting a correct exposure can be handled in many ways, and now-a-days you can even let the camera do it all for you, but composition and the art of seeing are a whole different story. There have been many articles written on the subject of composition, but a well-composed image is more a matter of practice and experience than it is one of following a list of rules. I am not saying that such
 rules are not important standards to follow, but they are not written in stone. Even Ansel Adams broke any rule of composition if it gave him the final results he was after. If it was good enough for Ansel then it is darn sure good enough for me, and I would say, most other people. You just have to know how to work those rules.
The best photo images are not just taken, they are “made,” and I have always thought that learning good photo composition is not much different than learning anything else. Some people just catch on faster than others because they have an eye to see and work with what is in a scene, and do what they have to do to balance them all together, but eventually most people can do it given some good pointers and time to practice. How long that takes mostly depends on how you go about it. The only real way to practice composing a good image is by recording them on film, or digitally, so that you can see what you did right, and what you did wrong. However, just slapping a lens on your camera and shooting away is not the answer either.
Many years ago I came across what I feel is probably one of the best ways to learn composition, and also probably the hardest to use, but the concept is very simple. You take one camera body, one lens, one roll of film (or memory card), and you pick one subject to shoot. Then go out about town, or country, and fill that one roll with that one subject only, and take your time doing it. If need be use an extra camera and lens that you can use for this one project as you have the time. What camera or film you use makes little difference, but I do suggest that you only use a lens of 35mm or less. In fact, the wider angle the lens is the better. You will see what I mean when you start trying to compose an image that has a huge field of view. Telephoto lenses are too easy to compose with, as just about any way you turn you can frame a shot with them, but a wide angle lens will make you “work” to get things right. A distracting object will make you move in, or around to eliminate it, or if you need more of a tree branch across the top of the frame you may even have to lay down on the grass to get it right.
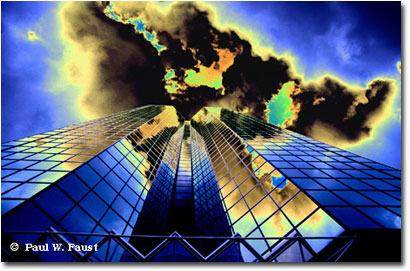
On a recent day trip I made to add some images to my stock files, I got an added bonus of the illustration shown here for this article. I decided to shoot some reflections wherever I could find them, but with the one lens limit. I attached a 19-35mm wide-angle zoom lens to my Nikon 8008s and headed down town. I picked a day after a large storm had just passed through, as that is when you get a sky full of big dramatic white clouds. If you do use a zoom lens, stick to one focal length only. In this case I shot everything at the 19mm setting.
Since tall office buildings always make for great cloud reflections, that area is where I headed first. In this shot I included a bit of the lower frame work to add a base to the image, and then framed the building to get as much of the sky and reflections as possible. The wider focal length and the clouds right over top of the building made it feel like the glass went on forever. The final image you see here was a later manipulation test in Photoshop where I solarized just the sky area and got an even more dramatic effect.
Here is one last tip on composition; if there is any object that appears in the frame which does not “enhance” your image, then it will most often “detract from” the image. Those will be things like telephone poles and wires, tree branches where there is no tree, and generally items that do not match the rest of what you want to show in your image. This is where the use of the wide angle lens will give you a lot of practice working to eliminate those things, because the wider the angle, the more things that appear in the frame, and the more you have to pay attention to what is there that should not be.
Once you try this composition test, and see just how demanding it is, you will also see just how much better your images start looking with all of your lenses, as you learn what to show in a shot, and what to make sure does not show up there.
Good shooting!
Editor's note - View more of Paul's work in his online portfolio.
PWF-NPN 1680
Comments on NPN nature photography instructional articles? Send them to the editor.