Blending Exposures in Photoshop Elements |
Adobe Photoshop Elements, a less expensive alternative to the industry standard, Adobe Photoshop, satisfies most image editing needs of beginning photographers. Yes, it unnecessarily over-simplifies some tasks while omitting many others found in the professional version. And to those who have used Photoshop for years, the counter-intuitive terminology can be downright maddening (for example, Curve adjustments are referred to as “Adjust Color Curves” even though it doesn’t give the opportunity to adjust individual color channels). But still, at only one-sixth of big brother’s price, Photoshop Elements is often the first photo-editing software purchased by beginners and it’s quite adequate for most photo editing.
One feature absent from Elements that has long bothered me, however, is the ability of the user to create and use layer masks. An empty mask is automatically created and coupled with a new adjustment layer, but a layer mask cannot be created for a background copy or an imported layer. This omission makes exposure blending, an important tool for digital photographers, impossible. Or does it?
After ten-plus years of leading nature photography workshops and teaching classes on digital nature photography, the process of capturing multiple exposures in the field for exposure blending has become an essential technique that I teach when interpreting high-contrast scenes. Students using Elements would learn how to capture the relevant image data in the field and how to blend it in Photoshop, but they couldn’t practice the technique once the class ended without the expensive upgrade. That bothered me greatly.
Finally, I bought a copy of Elements for myself and searched for a way to essentially achieve the same result without the missing mask feature. The solution was much easier than I could have ever imagined – it just involves an extra step or two.
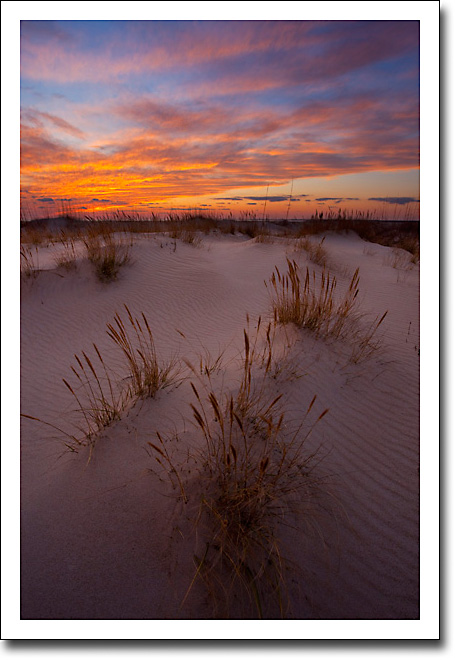
I am going to demonstrate a very basic example of blending two exposures at sunset: one image is exposed while retaining detail in the foreground and the other is exposed for detail in the sky. I’ll try to make this as simple and easy as possible.
First, open both images at the same time and place side by side. Window > Images > Tile will do that for you.
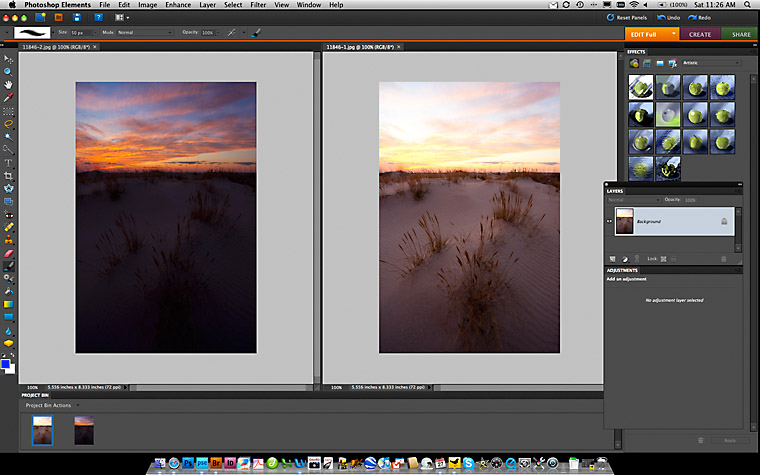
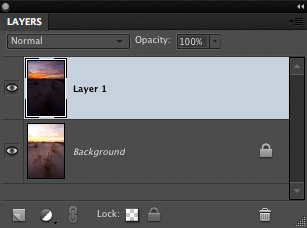
Since I want to use the sky from the darker image with the foreground of the lighter version, I am going to copy and paste that darker image onto the lighter one. There are several different ways to do this, but the easiest is using your keyboard’s shortcut keys. Select the darker image (Ctrl + A on PC or Command + A on Mac), copy it (Ctrl + C on PC or Command +C on Mac), then activate the lighter image and paste the darker right on it (Ctrl + V on PC or Command +V on Mac). Now the lighter image should have the darker image on top of it, shown as a new layer in your layers palette (If the Layers Palette is not visible, go to Window and check “Layers”).
At this point, you may want to get rid of that original darker image so it doesn't get in the way and confuse you. It's not needed any longer now that we've copied it to the lighter image. This is optional, by the way.
What we now want to do is mask the top layer, but since this is not possible in Elements, we have to “steal” a layer mask from an adjustment layer. Remember when I stated earlier that layer masks are available for adjustment layers? Well, let’s steal one, ok?
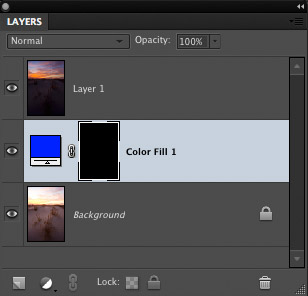
First, we need to create an adjustment layer from which to steal the mask. Let’s use “Solid Color.” Click the little circle that is half black and half white at the bottom of the layers palette and choose “Solid Color.”
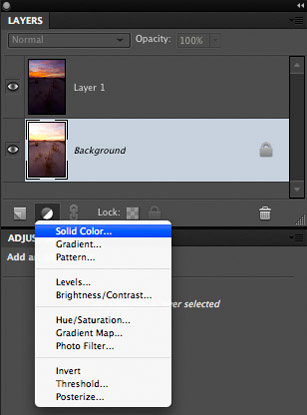
A dialog box will pop up and ask you to choose a color. The color you choose it not important, so don’t waste too much time agonizing over this. In my example, it happens to be blue.
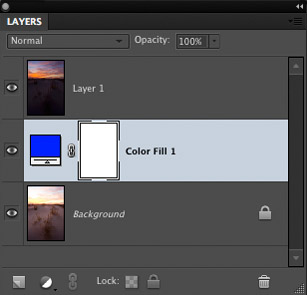
Next, you want to drag this new adjustment layer so that is sits directly below the layer you want to mask. In my example, this is the darker exposure on top.
Now, because we want to mask the upper layer, we need to invert the adjustment layer’s mask from white (which is transparent to the upper layer) to black (which is opaque). Click on the mask and type Ctrl + i (for PC) or Command + i (for Mac). Your layers palette should now look like the one below.
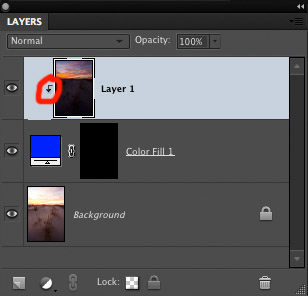
The next step is an important one and if you inadvertently skip it, none of this will work. Click on the upper layer that you want to mask and press Ctrl + G (or Command + G for Mac). This will link that upper layer to the adjustment layer and its mask immediately below it. If you see the little arrow pointing downward, you know you did it right.
There you go! If you followed the directions up to this point, you’ve just created a layer mask for a new layer in Elements! The black mask that we stole from the adjustment layer is linked to the layer created from the darker image. Now we can erase the portion of the mask that is hiding the darker sky and we will be done with this image.
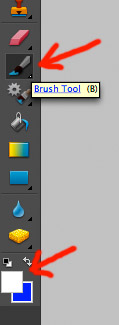
Click on the black mask (clicking activates it) and then select the brush tool from the tools palette found on the left. Using your keyboard’s bracket keys makes the brush size smaller or larger – left bracket, smaller and the right bracket, larger. Choose a size you’re comfortable using for the situation. A soft-edged or hard-edged brush will both work here, but most people feel more comfortable with a softer edge. You also want to set the foreground color to white at the bottom of the tools palette. The square on top should be the color white (See below).
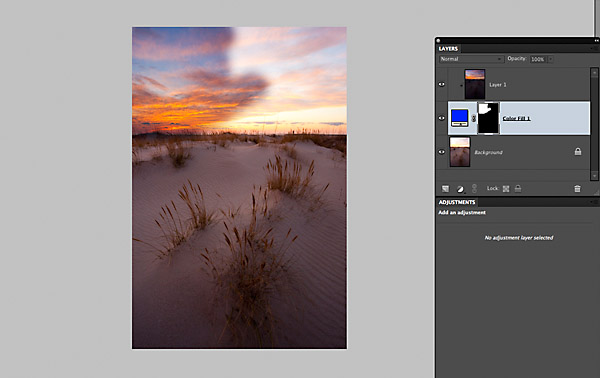
With your brush, you should now ”paint” the area of the image where you want the mask erased. In my example, I am literally erasing the portion of the mask that corresponds to the sky. As you can see, this “painting” is simply revealing the darker layer. Below you can see where I have partially revealed the darker sky. See how the pattern corresponds to the area of white on the black mask?
Keep “painting” until everything you want in the darker layer is now revealed. It’s a good idea to overlap into the remaining masked areas just a little bit to avoid halos.
The last step is blurring the edge of the mask to make the transition more natural. With the mask still activated (click on the mask again for good measure. We want to be sure we blur the mask, not one of the layers), go to Filter > Blur > Gaussian Blur. A dialog box will appear where you can choose the radius of the blur. There is no right or wrong answer here – just choose a pixel value that gives the most natural transition between the masked and unmasked areas.
And that's it! You can vary the opacity of the layer at this point or make further adjustments to fit your taste. You can flatten the layers and save it (Layer > Flatten Image) or save with layers intact.
Comments on NPN digital nature photography articles? Send them to the editor. NPN members may also log in and leave their comments below.
Richard Bernabe has been a full-time professional outdoor photographer and writer since 2003. He's had thousands of publishing credits over the past 20 years and he regularly leads photography tours and workshops across the United States as well as internationally. Richard also serves as a managing partner of Mountain Trail Press and Editor-In-Chief of NPN. You can see more of Richard's work at his personal website and at Mountain Trail Photo.