A small flashlight should be standard equipment in every nature photographer’s photo bag. Not only are flashlights useful in emergencies and have hundreds of uses, but they can also supply us with the most necessary ingredient in photography – light. If you haven’t yet tried using a flashlight to add an accent of light to your imagery, then now is the time to try. Flashlights have gotten smaller, and more powerful than ever. Here are a few pocket lights I like and some images that have been created using them.
Streamlight Stylus Penlight
|
The Streamlight Stylus is the size of a standard pen or pencil and utilizes a LED light source that is available in four colors; white, red, blue, and green. Besides being extremely portable, what I like best is that the lights are extremely bright, and have a nice narrow beam (with the protective boot installed) which makes it perfect for adding accent light to macro and intimate nature scenes.
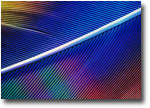
Photo 1 shows the primary feather from the wing of a hawk. The feather was a dull brown but with the help of the red, green and blue Streamlight penlights, I easily created a rainbow hued feather. Shooting these kinds of images is easy. Simply shoot under low light levels, so you have an exposure of at least 15 seconds or longer (I prefer to shoot with longer exposures of about 1 minute). Underexpose your image one stop from the correct ambient exposure and use the flashlights to paint streaks of color onto the subject. Canon EOS-1n, Fujichrome Velvia 100F, 30 seconds at f22, Streamlight red, green and blue Stylus penlights.
Streamlight Stinger
The Stinger series of flashlights are standard issue to the Royal Canadian Mounted Police. These lights are small (7 inches) and powerful (15,000 candle power or approximately 100 lumens) - perfect for law enforcement uses. These qualities also make them great for lighting larger nature scenes. I have had a Stinger in my bag for years and have used it to light a myriad of subjects.
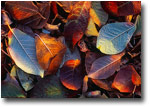
In Photo 2, I used my Stinger to selectively light small sections of leaves on the forest floor. To help narrow the beam of light I put a six inch long piece of black PVC tubing over the front of flashlight. This tubing also helps prevent stray light from causing flare into the camera lens. I underexposed the ambient light by one stop and dabbed bits of light here and there with the Stinger during the long exposure. Canon EOS-1n, Fujichrome Velvia 50, 2 minutes at f 16, Streamlight Stinger.
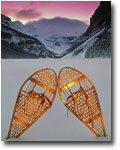
I also used a Stinger to add fill light to the snowshoes in this sunset scene of Lake Louise in winter (Photo 3). Here I used the flashlight “bare-headed” (no PVC tube) to give me a broader beam of light. The Stinger is powerful enough to add light to this fairly bright scene. Mamiya 645 Pro 45mm. Lens, Fujichrome Velvia 50, Four seconds at f16.
If you think a Stinger deserves a place in your pack, you might want to opt for the Twin-Task 2-cell instead. At 72 lumens of power, this light is almost as powerful as a Stinger but is much more portable - over 3 inches shorter and nearly half the weight.
Streamlight UltraStinger
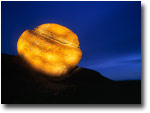
For really powerful lighting work you need a flashlight that can really light up the night. Flashlights that have power in the 40,000 to 100,000 candle power range can be used to light up grand chunks of real estate. At 75,000 candlepower, the UltraStinger is easily up to the task, I used an UltraStinger to light up a rock in Red Rock Coulee Natural Area in Alberta (Photo 4). Mamiya 645 Pro, 45mm lens, Fujichrome Velvia 50, UltraStinger flashlight, 4 minutes at f11.
To make this shot, I waited until the sky was fairly dark. Proper exposure for the sky was 2 minutes at f11. I set my camera on bulb and proceeded to make a 4 minute, f11 exposure. The film I was using, Velvia 50, suffers badly from reciprocity failure and requires at least 1 – 2 stops more exposure anytime it is exposed for longer than 1 minute. Usually I only add one stop more exposure in these cases because the results will be slightly underexposed and look more dramatic. The sections of the rock lit by the flashlight beam only required 8 seconds at f11 for proper exposure. I narrowed the beam of the flashlight by using PVC tubing over the head of the flashlight. The beam of light with the PVC tubing covered about 10-percent of the rock. I held the flashlight beam on each section of rock for about 8-10 seconds, overlapping each section a bit to ensure the whole rock was lit. It took me about 2 minutes to light up the entire rock. The result is patchy looking light that really has an interesting look to it. For more examples of this technique see these images: Delicate Arch at Night and Painted Stump.
I hope that this article has inspired you to try out adding supplemental light to your nature scenes using a flashlight. Sometimes the light nature gives us just does not cooperate. When this happens it helps to have a little ‘portable power’ in your pocket.
DW-NPN 0343
About the author...
Darwin Wiggett and his wife Anita Dammer are the proprietors of Natural Moments Photography. Anita has 17 years experience as staff photographer for the Glenbow Museum in Calgary and is currently doing freelance stock photography and is the editor-in-chief of Photo Life magazine. Darwin has been shooting stock since 1990, and has two books published by Whitecap in Vancouver; Darwin Wiggett Photographs Canada and Seasons in the Rockies. Together they specialize in landscape, nature, animal, humor and kid photography and are represented by various stock agencies worldwide. Their primary stock agent is First Light in Toronto, Canada. You can view more of Darwin's work in his online portfolio.
Comments on NPN nature photography instructional articles? Send them to the editor.