Blending Exposures in Photoshop |
One powerful advantage of the modern digital darkroom is the ability to expand the camera’s capability by blending multiple photographs into a single image. By blending photographs, you can increase the field of view and/or resolution (stitching), remove unwanted elements, reduce noise, increase the depth of field, and increase dynamic range. Whether you blend using an automated program or by hand, no one method will work best in all situations. Automated blending programs can be simple to use, time efficient, and produce optimal results with some images. Unfortunately though, there are many images where the results are less than optimal. Although blending by hand can be more labor and skill intensive, many images look more natural with this method.
One commonly recommended method of blending by hand involves a broad transition between photos. An example of this method would be editing a layer mask in Photoshop, using the Gradient Tool or by painting with a soft-edged brush. An advantage of this method is that the broad transition allows for a gradual change between photos. This is essential when the photos are different in the area of the blend, such as when blending two images processed differently, one for shadows and one for highlights, from the same raw file.
I use broad transition blends, and find they can work well in smooth areas such as sky, clouds, and water. Unfortunately, on some images this method results in unnatural transitions, loss of detail, or ghosting. Unnatural transitions occur when the difference in dynamic range between the two photos is too strong, resulting in an appearance that appears too dark, too light, or both in the area of the blend. Loss of detail occurs when the photos are even slightly different in luminosity detail; if what is sharp in the photos is not exactly the same, the blended area will be less sharp than either photo. Ghosting occurs when an object in the transition area moves between photos, resulting in a “double-vision” appearance with two faded versions of the object showing in the final image.
Another method of blending is to create a narrow transition between photos. In many images, if the photos are properly prepared beforehand, this method results in a more natural appearing blend. While this method can be used to blend for all the reasons noted above, in this article I will describe my method for blending photographs with a narrow transition using two examples. The first example will create an image with increased depth of field, and the second an image with increased dynamic range. This is an intermediate level article, and assumes a working knowledge of Levels, Curves, Masks, and Tools in Adobe Photoshop. These instructions and accompanying illustrations use my current version of Photoshop, CS3 for Windows. If you use a different version the specific steps may be different, but the general workflow should be similar.
Before beginning, it is important to emphasize that when blending using a narrow transition the goal is to make the areas to be blended as similar as possible in both photos prior to blending. This begins when taking the photos. You should use a solid tripod to minimize movement. Use a similar white balance setting between photos, set either in your camera or in your raw converter. Unless you are blending for depth of field, use the same focus for each photo. Unless you are blending for dynamic range, use the same exposure for each photo.
Okay, let’s get started. In this first example we’ll use two photos that are similar in all respects except for depth of field, one photo with the foreground in focus and a second with the background in focus, with a zone of overlap where both photos are in focus.
1. Create a new Photoshop document with each photo as a separate layer.
a. Open one of the photographs in Photoshop.
b. Copy the photo (Select:All and then Edit:Copy).
c. Close the photo (File:Close).
d. Open the second photo in Photoshop.
e. Paste the copied photo as a new layer in the second photo (Edit:Paste).
f. I like to add the photo with the background in focus as a layer above the photo with the foreground in focus, but that’s just a personal preference.
g. To protect your originals, save the layered document as a new file (File:Save As…).
2. Align the photos.
a. Select both layers by clicking on one, and then clicking on the second while holding down the control key. (When selecting a layer in Photoshop, be sure to click in the empty area to the right. Clicking the different icons or the title may have a different effect.)
b. With both layers selected, align the photos (Edit:Auto-Align Layers…). For many images, using Photoshop’s Auto-Align feature works very well. For images where Auto-Align is unable to acceptably align the layers, I recommend using a stitching program such as PTAssembler or PTGUI. While these programs have a learning curve, they are very powerful for aligning images.
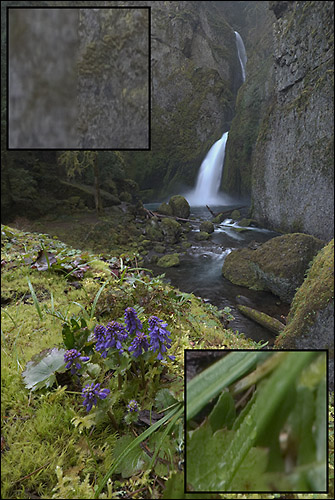
3. Note the area where both photos are in focus. In step number four, it is important to know, yet difficult to see, where the photos are in focus. If you are unsure, there are several methods to note the in focus areas.
a. One method is to drag guides to the top and bottom of the overlapping areas of focus. Be sure the rulers are showing (View:Rulers), and create guides by clicking the ruler and dragging guides to the top and bottom of the area you want to blend.
b. A second method is to create an additional copy of the top photo as a third layer that can be toggled off and on so that you can remind yourself of the in-focus areas. To do this, select the top layer and copy it into a new layer (Layer:New:Layer via Copy) Turn off the new layer’s visibility for now (click the “eye” icon at the left of the layer in the Layers Palette.), and then turn it on as necessary to visualize the in-focus areas while completing the steps below. After creating a selection as described below, you can delete this top layer.
c. A third method is to select the area where both photos are in focus, and then to use this selection to create a new layer. To do this, loosely select the area to be blended (I use the Lasso Tool), and then create a new layer from the selection (Layer:New:Layer via Copy). Turn off the middle layer’s visibility, and instead use this new layer in the following steps. After creating a selection as described below, you can delete this top layer.
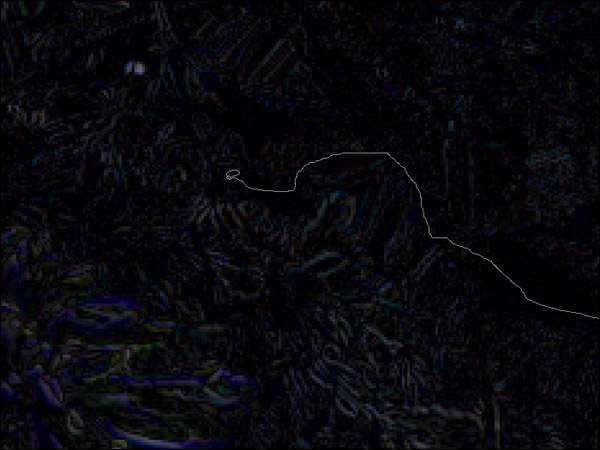
4. Set the top visible layer to Difference mode. In difference mode, areas in the current layer that are different from the layer below are lighter, while areas that are similar are darker. (Areas that are completely different are white and areas that are exactly the same are solid black.) This allows you to see and avoid areas that are not alike. For example, if a breeze was moving a flower between the two photos, it is very easy to see and, in the next step, avoid this difference.
a. Click the top visible layer to select it. (In the methods noted in step three, this will be the second layer in 3a and 3b, and the third layer in 3c.)
b. In the Layers Palette, use the drop down list to select Difference.
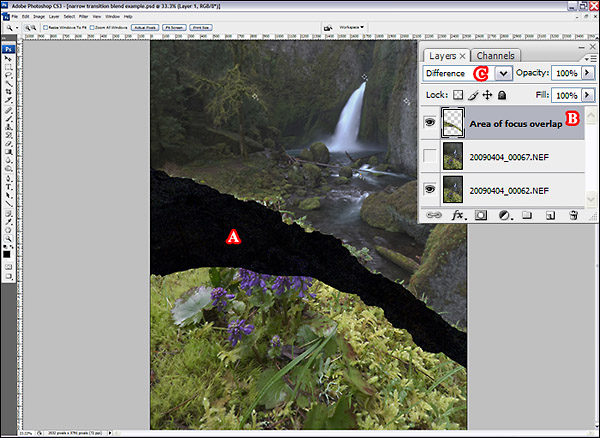
5. Create a selection.
a.Using the Lasso Tool, create a selection that traces through the darkest areas and avoids light areas in the zone of overlap. You may need to zoom in and out during this process; in areas with a lot of detail you may need to zoom in as much as 200%. If you make a mistake, just add or subtract from the selection as necessary.
b. Keep adding to the selection as you move across the photo. When you have traced a selection from edge to edge, extend the selection to the adjoining corners.
c.When complete, change the blending mode back to normal. If you created a temporary layer to help with creating the selection, methods 3b and 3c above, it can be deleted now.
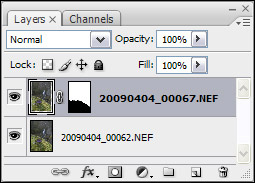
6. Create a mask from the selection.
a. Select the layer to be masked (the upper layer) and click the New Layer Mask button on the Layers Palette.
7. Blur the mask. Using a very slight blur can help smooth slight differences between the photos along the edge of the mask.
a. In the layers palate, click on the mask icon for the mask created in the step above to activate it.
b. Slightly blur the mask using Gaussian Blur (Filter:Blur:Gaussian Blur…) with a small radius (usually 1.0 to 2.0 pixels).
8. As a final step, click the layer’s visibility on and off to be sure the transition is imperceptible. If you can see the transition, you may need to review and repeat the above steps and make changes as necessary. If the transition is visible because one photo is lighter or darker, we’ll figure out how to fix that in the next example.

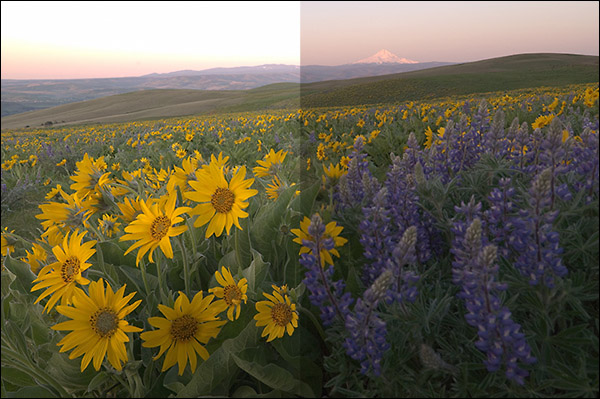
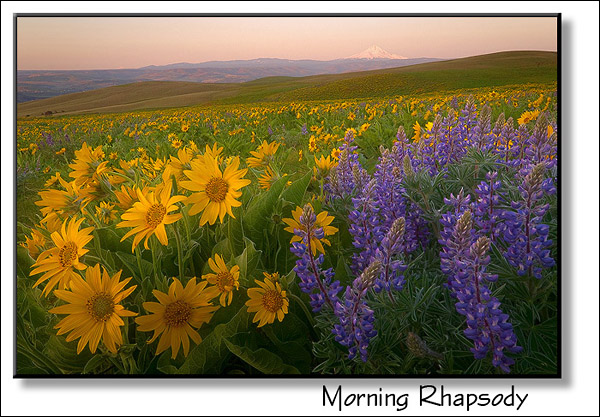
In our second example we will combine photos similar in all respects except dynamic range, combining a photo exposed correctly for highlights with a second photo correctly exposed for shadows. This is a more challenging situation, because as taken there is no area of overlap; we must first adjust the photos so that there is an area of overlap while protecting the detail we are trying to gain.
1. Create a new Photoshop Document with the photos as separate layers, just as you did in the first step in the above example.
2. Determine the zone of overlap. Where to blend the photos varies from image to image, and takes some experience to determine. As a general rule of thumb, I try to find an area that is not too extreme in either photo. Avoid areas that approach 0 or 255 in any of the channels.
a. With the upper layer visible and the Info Palette open, move your cursor around potential blending areas and note the color values.
b. Next, turn off the upper layer’s visibility and repeat the process on the bottom layer.
c. Note a general area where both photos have good detail.
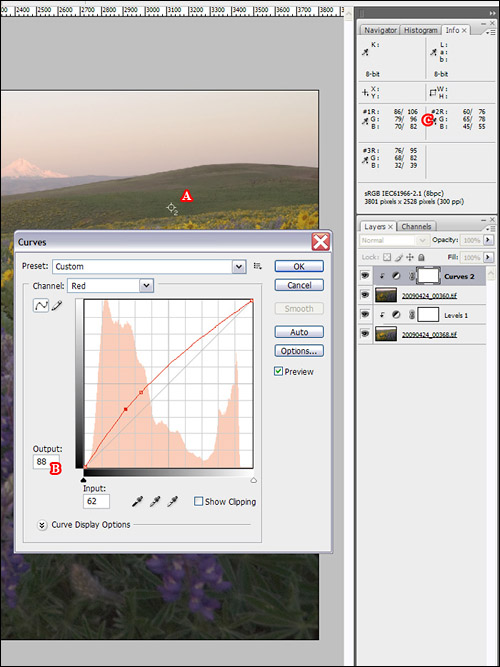
3. Place Color Samplers in the zone of overlap.
a. Using the Info Palette, find the darkest and brightest areas in the zone of overlap.
b. Place a Color Sampler in each of these, first in the darkest area and then in the brightest area. Since 60% of the luminosity comes from the green channel, I most often use the green value to find these areas. (Remember that the Color Samplers sample the same number of pixels as the Eyedropper Tool. Change to the Eyedropper Tool, and right click in the image to select the sample size. I usually a medium sample size, but sometimes use a smaller sample size for areas with high detail or a larger size for very smooth areas. After selecting a sample size, change back to the Color Sampler Tool.)
c. Finally, place a Color Sampler in an area of luminosity roughly midway between the highest and lowest values.

4. Approximate the luminosity in the zone of overlap using a Levels Layer. Our goal is to adjust the luminosity of the upper layer so that it matches the luminosity of the lower level. In this step we’ll approximate it, and then refine it in step number five. Again, with rare exceptions, the green value will work best for this step.
a. Turn off the upper layer’s visibility and write down the green value for the 3rd color dropper (the last one placed, visible in the Info Palette) for the lower layer.
b. Turn the upper layer’s visibility back on, and select the upper layer by clicking on it.
c. Add a Level’s Layer (Layer:New Adjustment Layer:Levels…). Select the “Use Previous Layer to Create Clipping Mask” option box, so that the adjustment layer’s effect will be restricted to the upper layer.
d. Note that the Info Palette now shows two values for each color, the value on the left is the original color, and the value on the right is the adjusted color. We want to adjust the original green value of the upper layer to match the lower layer’s value we recorded above.
e. In the Levels Layer’s dialog, click in the Middle Input Box (the one with the initial value of 1.00). As you observe the green value in the Info Palette, adjust the value up or down so that upper layer’s green channel value is the same as the value you recorded for the lower layer.
5. Fine-tune using curves layers.
a. Once again, turn off the upper layer’s visibility so that the Info Palette shows values from the lower layer. This time write down all three values, red, green, and blue, for each of the samplers.
b.Turn the upper layer’s visibility back on, and select the Levels Layer by clicking on it.
c.Add a Curve’s Layer (Layer:New Adjustment Layer:Curves…). As before, select the “Use Previous Layer to Create Clipping Mask” option, so that the adjustment layer’s effect will be restricted to the upper layer.
d.In the Channel drop-down list, select the Red Channel. Using the cursor, Ctrl-click on the darkest Color Sampler to add a point to the curve. In the Input box type the red value for the first Color Sampler (the left value for R: in Color Sampler #1), and in the Output box type the red value from the same Color Sampler that you recorded from the lower layer. In the Info Palette, the red value should now show the top layer’s value on the left, and the lower layer’s value on the right. Repeat this procedure, ctrl-clicking on the second dropper, to adjust the brighter red value from Sampler #2. Occasionally, adjusting the brighter value may make a slight change in the adjusted value for the darker value, and you may need to make a slight adjustment to that point on the curve so that the output continues to match the value from the lower layer. Note the values for the middle range, Color Sampler #3, too. If the values are the same or relatively close, you don’t need to worry about this Color Sampler. Rarely, if the values are quite different, you will need to add a third point to the curve by Ctrl-clicking on this Sampler and adjusting its values in a similar fashion. Next, repeat these same steps for the green and blue curves. When finished, click Okay.
e. Double-check the results by clicking the upper photo’s visibility on and off. The color dropper values should stay the same. If not, note where the values are different and adjust the curve points as needed.

6. Now that the photos have a similar zone of overlap, create a selection and mask using the difference mode as described in steps four through eight above.
These two examples illustrate blending with narrow transitions. As you can see, this method relies on both images being similar at the blended area. In that regard, there are several situations that are important to discuss.
In the depth of field illustration, you should note that the method requires an area of overlapping focus to be successful. This works best when there is a steady transition from near to far, similar to the type of scene where a tilt-shift lens works well. Sometimes this is impossible when you have a sudden transition from near to far. An example of a close object superimposed onto a far object would be a flower in the foreground in front of, and in a different plane of focus than, a distant mountain directly behind. In this situation, there is no area where both photos are in focus because the out of focus margin of the flower in one photo is wider than the sharply focused margin of the flower in the second photo. (If there is no movement between the photos, automated blending software such as TuFuse or Helicon can sometimes combine a series of photos variably focused from near to far to produce an acceptable blend.)
In the dynamic range illustration I sometimes obtain better results if I use a levels layer for each photo, one to brighten the photo optimized for the highlights and one to darken the photo optimized for the shadows, so that the dynamic range of the two meets in the middle. In other words, I adjust both photos a smaller amount as opposed to adjusting only one photo a large amount.
In an image with extreme variation in dynamic range, you may need more than two photos blended to keep detail in both the shadows and highlights. For example, a photo exposed for the shadows, a second for the mid-tones, and a third for the highlights. In this situation I would use Curves and Levels layers to darken the photo optimized for the shadows, and another set to brighten the photo exposed for the highlights, so that both can be seamlessly blended with the mid-tone photo. I typically have good success if my photos are bracketed 1 ˝ to 2 stops apart, and then blend enough photos to both avoid blowing the highlights and to minimize noise in the shadows.
I often find that I can combine depth of field blending with dynamic range blending. As an illustration, if you have a bright sky in the distance and a dark foreground you may be able to take three photos that when combined give you good detail throughout, one optimized for shadows with the foreground in focus, a second optimized for shadows with the background in focus, and a third optimized for highlights with the background in focus.
Feel free to experiment with other ways to create a selection. Do you have a scene where you just need to blend some detail back into small areas of blown highlights and nothing moved in the scene between your bracketed photos? Save some time by selecting the highlights (Select:Color Range… and choose Highlights from the drop-down menu) and then expand the selection (Select:Modify:Expand…) a little. You can then use the difference mode to see if you need to add or subtract from the selection before proceeding.
And finally, you may find some photos need an additional Levels or Curves layer restricted by a mask to a certain portion of the blend. An example of this would be if between photos a cloud made a portion of one photo darker than it was in a prior photo.
If you are interested in blending or have been blending with broad transitions, hopefully these two examples will give you ideas to begin experimenting with narrow transition blends. Experiment with this technique to fit your own needs. If you are trying to photograph a waterfall and you just can’t get a shot without a water drop on the lens, take two and blend the drop free areas together. If you are trying to photograph an iconic location but just can’t seem to keep people from wandering through the scene, take two or more photos that when blended together leave the scene people free.
Since no one method of blending works well in all situations, automated, broad transition hand blending, and narrow transition hand blending all have a place in the photographer’s list of tools. With experience you will find situations where you will favor one over the other, or you may even use multiple types of blending in the same image. Whether you have experimented with blending before or not, hopefully you will find narrow transition blending to be one more potent tool you can use to improve your images.
Comments on NPN digital nature photography articles? Send them to the editor. NPN members may also log in and leave their comments below.
John Williams is a small-animal veterinarian practicing in Battle Ground, Washington, USA. Right about the time he moved to the Pacific Northwest at the close of 2002, he became interested in expanding his bird watching hobby by digiscoping birds. Photographing birds quickly led to photographing the surrounding scenery, leading to a passion for landscape photography. Whenever possible he continues to escape, with his (occasionally) trusty dog Jep, to the beauty of nature, hoping to record those magical moments of light that capture him far more then he captures them.